Fixing A Durabrand PVS-1960 DVD Player
The Problem
OK, so you have a Durabrand PVS-1960 dual-screen DVD player, and one day, you turn it on, and the LCD screens have no power. Then you smell the smoke that's coming out of the player. Well, you may be able to fix this easily with just a soldering iron and a piece of wire.
Why Did It Burn Up?
I personally have watched one of these players smoke because of a bad cable. I bought a second dual-screen player set from an eBay auction that was advertised to be not working with no power to the LCD screens. When I got it, I plugged the new cables and screens into my old working player, and poof! Out comes a puff of smoke. I then looked at the new cables and saw that one cable had a bent pin which was shorting power to ground. Great, now I have two dead DVD players. Maybe this happened to you, but I also think that some electronic parts inside this player just weren't designed to handle the large amount of current that each of the LCD screens uses.
Warning!
Ok, first of all, these are quick-fix hacks that you can do to your broken Durabrand PVS-1960 DVD player to get it working again. They alter the original circuit a bit, but they have been working OK for me. I've done these hacks and my player has been running for months without problems. However, because your circumstances may be different from mine, I can't tell you if they will work for you. You be the judge. If you use this information to fix your player and it catches on fire and burns your car up, don't blame me.
Disassembling The Player
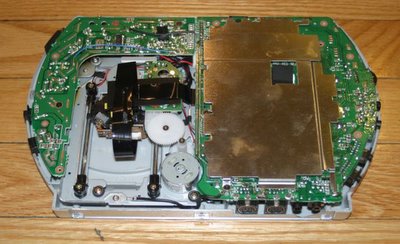
First, you need to remove the metal back of the player and the plastic trim ring. Just remove the screws to take the back off. You might have to use a small screwdriver to pry the plastic trim ring off, but it's not that hard. It should look like the picture below when you're done. Note that there are two circuit boards -- the main board, and an L-shaped power supply board.
Bad IC601
First, look on the top side of the power supply board for IC601. If often burns up. A bad IC601 looks like this: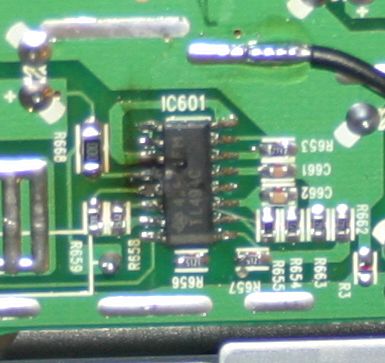
I'm not into de-soldering and replacing surface mount ICs, and I don't have a quick-fix hack to solve this problem. And that's all I will say about that. Moving right along...
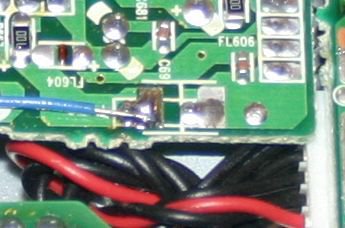
Bad Q601
This is the part that I've seen burn up the most. It's on the other side of the power supply board. Remove the two screws and flip it over. Q601 is near the inside of where the board bends. Here's what a bad one looks like. And now for my quck-fix hack. As far as I can tell, this is used as part of the power supply for the LCD screens. When it goes bad, the LCD screens lose power. I don't know exactly what the purpose of this part is, but I have found out by reading information on the web and by experimentation that you can put a jumper wire in which supplies 12V directly to the LCD power lines and it works OK. This jumper bypasses Q601, so it doesn't need to be replaced. The easiest place I found to solder the jumper wire is on the top of the power supply circuit board in the place shown below. It's the blue wire.
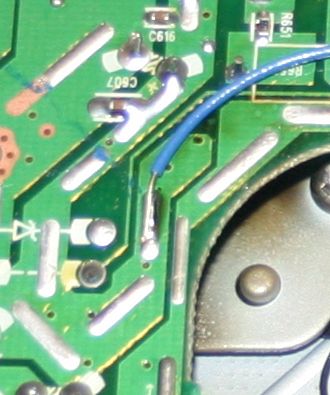
Here are close-ups of the two ends of the blue wire.

Bad FL502
Here's another part that seems to burn up: FL502. It's on the top of the main board near the monitor jacks. Here's a bad one.
 I stuck a multimeter on a good part and found that it had a resistance of zero ohms. Well, I can't think of a better zero ohm replacement part than a wire, so just clean off the burned part and solder a wire in its place. I use alcohol and an old toothbrush to clean off the burned stuff.
Conclusion
Once again, perform these hacks at your own risk. There are probably some saftey features that have been disabled by these hacks. If you can think of a good reason why you really shouldn't do this stuff, please post a comment. I would like to know. Also, if you try these and have success, I would like to know that too!
Donations
I'm glad to help everybody for free, but if you feel that you must return the favor, I'll take donations via PayPal. Any amount sure would be appreciated! Just press the button below.
posted by John Sevinsky @ 6:36 PM
75 comments
![]()
